SNS認証で秒速ログイン機能が実装したい!

質問箱を筆頭にワラワラ出てくる人気サービスに必ずと言って良いほど実装されているSNSログイン機能。
 ろっこ
ろっこ
と思い、実装していきたいなぁなんて考えていたのですがなかなか情報にたどり着かず。
どの記事もSNS認証 + メールアドレスなどの登録といった感じなんですよね。
と言うわけでネットサーフィンをしまくって何とか形にはなりました。
参考にさせてもらった記事
・[*Rails*] deviseの使い方(rails5版)
・【開発メモ】RailsアプリにTwitterログイン認証機能を実装する方法
・【Rails】deviseのTwitter認証で「Unauthorized 403 Forbidden」が出てしまう場合の対処法
次回以降のためにもメモしておきます。良かったら使ってください
環境
Rails 5.2.1
Ruby 2.5.1
devise 4.2.0
omniauth-oauth 1.1.0
omniauth-twitter 1.4.0
SNS認証で登録作業を1秒で済ませる実装
1、新規プロジェクトの作成
$ cd twitter_login
名前は適当にtwitter_loginにしちゃいました:)
2、『devise』と『omniauth-twitter』の追加
(略)

gem 'devise'
gem 'omniauth-twitter'

(略)
追記したらbundle installしましょう!
3-1、『devise』をインストールする
すると以下の文がズラーと表示されます
  ①. Ensure you have defined default url options in your environments files. Here
     is an example of default_url_options appropriate for a development environment
     in config/environments/development.rb:

       config.action_mailer.default_url_options = { host: 'localhost', port: 3000 }

     In production, :host should be set to the actual host of your application.

  ②. Ensure you have defined root_url to *something* in your config/routes.rb.
     For example:

       root to: "home#index"

  ③. Ensure you have flash messages in app/views/layouts/application.html.erb.
     For example:

       <p class="notice"><%= notice %></p>
       <p class="alert"><%= alert %></p>

  ④. You can copy Devise views (for customization) to your app by running:

       rails g devise:views
①〜④の指示を順にこなしていきます!
3-2、①default_url_optionsの設定
config.action_mailer.default_url_options = { host: ‘localhost’, port: 3000 }を環境ファイルに追記します。
(略)

  config.action_mailer.default_url_options = { host: 'localhost', port: 3000 }

  end
3-3、②root_urlの設定
まだ何もページを作っていない状態なのでrails generateします。
これでindexとshowページが作成されたのでroutes.rbにてroot_urlを設定します。
Rails.application.routes.draw do

  root 'pages#index'
  get 'pages/show'

  end
3-4、③flash messagesの追記
指定がある通り、applcation.html.erbにフラッシュメッセージを追記します。
(略)

 <body>
  <p class="notice"><%= notice %></p>
  <p class="alert"><%= alert %></p>

  <%= yield %>

 </body>
(略)
3-5、④copy Devise viewsの実行
実行すると
こんな感じでファイルが20個前後作成されるかと思います
4-1、Userモデルの作成
を実行し、Userモデルを作ります。
4-2、Userモデルの編集
class User < ApplicationRecord
 devise :database_authenticatable, :registerable,
           :recoverable, :rememberable, :trackable,
           :validatable,:lockable, :timeoutable, :omniauthable,
           omniauth_providers: [:twitter]

    def self.find_for_oauth(auth)
       user = User.where(uid: auth.uid, provider: auth.provider).first

        unless user
          user = User.create(
           uid:      auth.uid,
           provider: auth.provider,
           email:    User.dummy_email(auth),
           password: Devise.friendly_token[0, 20],
           image: auth.info.image,
           name: auth.info.name,
           nickname: auth.info.nickname,
          )
        end

       user
     end

  private

  def self.dummy_email(auth)
    "#{auth.uid}-#{auth.provider}@example.com"
  end


end
5、マイグレーションファイルの編集
コメントアウト状態なので、シャープを外していきます
class DeviseCreateUsers < ActiveRecord::Migration[5.2]
  def change
    create_table :users do |t|
      ## Database authenticatable
      t.string :email,              null: false, default: ""
      t.string :encrypted_password, null: false, default: ""

      ## Recoverable
      t.string   :reset_password_token
      t.datetime :reset_password_sent_at

      ## Rememberable
      t.datetime :remember_created_at

      ## Trackable
      t.integer  :sign_in_count, default: 0, null: false
      t.datetime :current_sign_in_at
      t.datetime :last_sign_in_at
      t.string   :current_sign_in_ip
      t.string   :last_sign_in_ip

      ## Confirmable
      t.string   :confirmation_token
      t.datetime :confirmed_at
      t.datetime :confirmation_sent_at
      t.string   :unconfirmed_email # Only if using reconfirmable

      ## Lockable
      t.integer  :failed_attempts, default: 0, null: false # Only if lock strategy is :failed_attempts
      t.string   :unlock_token # Only if unlock strategy is :email or :both
      t.datetime :locked_at
      t.timestamps null: false
    end

    add_index :users, :email,                unique: true
    add_index :users, :reset_password_token, unique: true
    add_index :users, :confirmation_token,   unique: true
    add_index :users, :unlock_token,         unique: true
  end
end
これで有効化されました:)
6、マイグレーションファイルの追加
これでマイグレーションファイルが追加されたので、以下を実行。
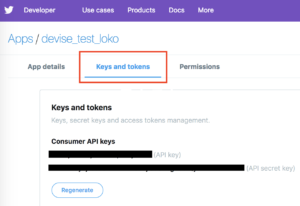
7、TwitterAPIのKeyを入力する
TwitterAPIを開き、devise.rbにkey情報を入力します
Devise.setup do |config|
  config.omniauth :twitter, 'ここにAPI key', 'ここにAPI secret'
end
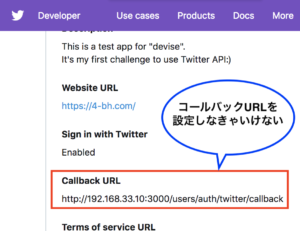
Twitter APIの仕様変更に伴い、Twitter Developer側でのコールバックが必要になりました。
Experiencing momentary disruptions?
This means you have not enabled whitelisting for your callback URLs. Be sure to follow our guidance on how to make these changes by June 12th or your callback URLs will fail. See our May forum post for guidance. https://t.co/uWBvhX30E6— Twitter API (@TwitterAPI) 2018年6月7日
多くのDevise系の記事ではコールバックは指定しなくて良いと書いてありますが、コールバックを指定しましょう
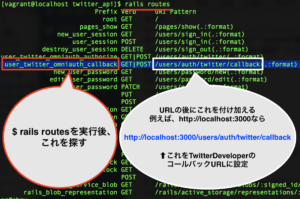
を実行後、コールバックのURLを探し、TwitterDeveloperにて設定しましょう
8、コールバックの設定
9、コントローラーの編集
class Users::OmniauthCallbacksController < Devise::OmniauthCallbacksController

  def twitter
    callback_from :twitter
  end

  private

  def callback_from(provider)
    provider = provider.to_s

    @user = User.find_for_oauth(request.env['omniauth.auth'])

    if @user.persisted?
      flash[:notice] = I18n.t('devise.omniauth_callbacks.success', kind: provider.capitalize)
      sign_in_and_redirect @user, event: :authentication
    else
      session["devise.#{provider}_data"] = request.env['omniauth.auth']
      redirect_to new_user_registration_url
    end
  end
end
10、ルーティングの追記
Rails.application.routes.draw do
    devise_for :users, controllers: { :omniauth_callbacks => "omniauth_callbacks" }
end
11、viewの調整
	<%if user_signed_in? %>
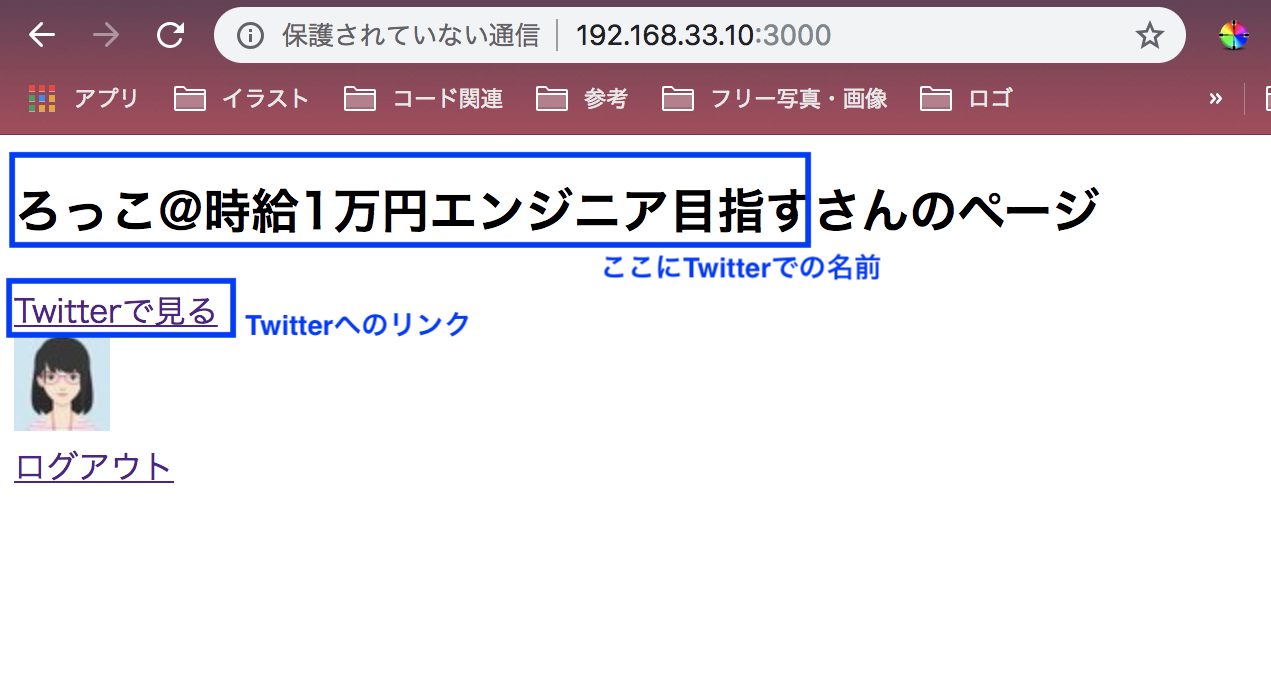
		<h2><%=current_user.name%>さんのページ</h2>
		<a href="https://twitter.com/<%=current_user.nickname%>">Twitterで見る</a>
			<br>
		<img src="<%=current_user.image%>">
			<br>
		<%= link_to "ログアウト", destroy_user_session_path, method: :delete %>
	<%else%>
          <%= link_to "ログイン", new_user_session_path %>
	<%end%>
完成

適当にCSSをいじって良い感じにしてみてください。


